This is the second in a series of posts about the TDWG
Standards Documentation Specification (SDS).For background on the SDS, see the first post.
Note: this post was revised on 2020-03-04 when IRI dereferencing of the http://rs.tdwg.org/ subdomain went from testing into production.
Implementation plan?
The SDS was ratified and issued in April of 2017. It did not, however, include any plan for its
implementation. It wasn't actually clear
whose responsibility it was to make implementation of the SDS happen. The Technical Architecture Group (TAG) might have
been a logical group to take charge, but in 2017 it had not yet been
reconstituted in its current form. As
the architect of the SDS, I had a vested interest in seeing it become
functional, so I decided to take the initiative to figure out how it could be
implemented. As I worked on this project, I got feedback from the Darwin Core Maintenance Group, key people working on the TDWG website and other infrastructure, and later from some TAG members.
Although the SDS provided a general framework, it left a lot
of the details to implementers.In
particular, the SDS had relatively little to say about the form of URIs used as
identifiers for documents whose form was specified by the SDS.For guidance, I looked to precedents set by
Darwin Core, general practices in the Linked Data world, and practicalities of
URI dereferencing.
The SDS model
The SDS describes a hierarchical model for resources within its
scope. That hierarchy is relatively
simple for documents within a standard: there is simply a hasPart/isPartOf
relationship between the standard and its documents.
For vocabularies, the situation is more complicated.The SDS describes four levels in the hierarchy
that applies to vocabularies: standard, vocabulary, term list, and term.There was some discussion in the run-up to ratification
of the SDS as to whether the model needed to be this complicated.At that time, I asserted that this was the
least complicated model that could accomplish all of the things that people
said they wanted to do with vocabularies in TDWG.
It would be tempting to say that a much simpler model might
be possible.For example, we could
consider the Audubon Core Standard to be synonymous with the Audubon Core
vocabulary.We could say that Audubon Core terms were a direct part of it -- a simple two-level hierarchy.
However, the Audubon Core Standard is more than just a set of
terms.The Audubon Core vocabulary is
distinct from the documents that describe how Audubon Core should be used (the
structure document, term list document, etc.), which are also part of the standard.Although we might lump the standard, vocabulary,
and documents together in our human minds, if we really aspire to have machine-readable
descriptions of components of TDWG standards, we have to distinguish between
things that are not the same -- things that have different authors, creation dates,
and version histories.
Example of first (standards) and second (vocabularies and documents) levels of the TDWG Standards Documentation Specification hierarchy
As I described in the previous post, there was also a desire
expressed in the community for the capability to have more than one
"Darwin Core vocabulary".Some
people might want only the basic vocabulary (a "bag of terms" with
definitions). Others might want a more complicated vocabulary where some terms
might be declared to be equivalent to terms outside of Darwin Core, or classes
might be declared to be subclasses of classes in an outside ontology.Still others might want to create a Darwin
Core vocabulary that restrict the values that can be used for certain terms, or
entail class membership through range and domain declarations.So although we don't currently have more than
one Darwin Core vocabulary, we want to allow for that possibility in the
future. That's another reason to have a model that separates the standard from the vocabulary or vocabularies that it defines.
Example of second (vocabularies) and third (term lists) levels of the TDWG Standards Documentation Specification hierarchy
Within a vocabulary, the SDS describes an entity called
"term list" (Section 3.3.3 and 4.4.2).
Example of third (term list) and fourth (term) levels of the TDWG Standards Documentation Specification hierarchy. This is an example of a list of terms defined by TDWG and only includes a few of the terms on the list.
For terms defined by a TDWG vocabulary, there is an authoritative
term list for each namespace.For
example, there is an authoritative term list for the dwc: namespace and another
for the dwciri: namespace.These lists
are considered authoritative because they define the terms they contain.Dereferencing a term list IRI should return
the term list document.
Example of third (term list) and fourth (term) levels of the TDWG Standards Documentation Specification hierarchy. This is an example of a list of terms borrowed by TDWG and only includes a few of the terms on the list.
A term list can also contain terms that are borrowed from
another vocabulary and included in the TDWG vocabulary. The SDS does not prescribe how borrowed terms
should be organized in term lists -- for example, whether all borrowed terms
should be included in a single list or whether there should be a separate term
list for each namespace from which terms are borrowed. As a practical matter, it made sense to create
a separate term list for each namespace.
Some notes about IRIs
According to the SDS, each resource in the hierarchy should
be assigned an IRI as an identifier (Section 2.1.1). An
IRI is a superset of URIs that allows for non-Latin characters to be used. For the purposes of this post, you can consider
URIs and IRIs to be synonymous.
There has always been confusion between the use of IRIs/URIsas identifiers and URLs as resource locators.Fundamentally, an IRI is an identifier that may or may not actually
dereference in a web browser to retrieve a web page about the resource.In the Linked Data community, it is
considered a best practice for IRIs to dereference, but it isn't a
requirement.In fact, there are a number
of "borrowed" term IRIs in Audubon Core that don't dereference and
probably never will.So although it
isn't a requirement of the SDS that TDWG IRIs dereference, one goal of
implementation is to eventually make that happen.
The origin of the subdomain rs.tdwg.org has always been a
little mysterious to me.I believe that
the "rs" part stands for "schema repository" and that it
was originally intended to be a place from which XML and other schemas could be
retrieved.Although I don't think there
is any official policy that requires use of the rs.tdwg.org subdomain for
TDWG-minted IRIs, that has become the convention with Darwin Core and Audubon Core
and I've taken that as the precedent to be followed when creating other IRIs that
denote resources associated with TDWG standards.The exception to this pattern are the IRIs
for the standards themselves.The
precedent there is that TDWG standards have IRIs in the form
http://www.tdwg.org/standards/nnn, where "nnn" is a number assigned to a
particular standard.
IRI patterns for vocabulary standards
I used the precedents established by the Darwin and Audubon Core
standards, together with the URI specification (RFC 3986) itself to establish IRI
patterns that are consistent with the hierarchy established by the SDS. Section 1.2.3 of RFC 3986 notes that a forward slash is used to "delimit components
that are significant to the generic parser's hierarchical interpretation of an identifier" and the IRIs of components of vocabularies can be interpreted this way.
Here
are the patterns I established or continued based on past practice:
Standards IRI:
http://www.tdwg.org/standards/nnn
where "nnn" consists of numeric characters assigned
to the standard.Dereferencing these
IRIs should lead the user to the landing page of the standard.Example of the Darwin Core standard:
Note that since these IRIs aren't within the rs.tdwg.org
subdomain, the test system I've implemented does not handle their
dereferencing. Standards IRI
dereferencing is handled by a separate system and I don’t know how fully functional
it is for all prior TDWG standards.
Vocabulary IRI:
http://rs.tdwg.org/vvv/
where "vvv" is a sequence of alphabetic characters
assigned to the vocabulary.Example of
the Darwin Core basic vocabulary:
where "vvv" is a sequence of alphabetic characters
assigned to the vocabulary and "ttt" is a sequence of alphabetic characters
assigned to the term list within that vocabulary.Example of the Darwin Core IRI-valued terms:
where "vvv" is a sequence of alphabetic characters
assigned to the vocabulary, "ttt" is a sequence of alphabetic
characters assigned to the term list within that vocabulary, and "nnn"
is the local name of the term.Example
of the "in described place" term:
The term pattern described above is backward compatible with
all current Darwin Core and Audubon Core term IRIs.Existing Darwin Core RDF/XML asserts relationships
between terms and the resource that defines them like this:
So the IRI pattern for term lists is also backwards compatible
with this previous use, with the name "term list" now explicitly given to
the resource that defines terms.
The IRI pattern for vocabularies is new, but is consistent
with the hierarchy and is necessary to distinguish between vocabularies and the
standards that create them.
IRI pattern for documents
Previously, there had been no consistent pattern for IRIs
assigned to documents associated with standards.Here are some examples of IRIs for Darwin Core documents:
The Darwin Core XML guide: http://rs.tdwg.org/dwc/terms/guides/xml/
The Darwin Core simple text guide: http://rs.tdwg.org/dwc/terms/simple/
To maintain backwards compatibility, these pre-existing IRIs
were left unchanged.However, the IRI patterns
used for Darwin Core documents make it difficult to distinguish programmatically
between term and document IRIs using pattern matching.So for all documents from standards other than Darwin Core, I
used this pattern:
http://rs.tdwg.org/sss/doc/docname/
where "sss" is a sequence of alphabetic characters
representing the standard and "docname" is a short series of alphabetic
characters representing the document.For example:
is the IRI for the Audubon Core Structure document.
Redirection
One thing that should be made clear is the distinction between
the IRI that identifies a resource and the URL that actually can be used to
retrieve a document or metadata about some other resource. Because the SDS considers the resources it describes as abstract entities, those entities can have multiple formats or serializations
that are distinct from the abstract resources themselves. For example, the Audubon Core Structure
document is an abstract thing identified by http://rs.tdwg.org/ac/doc/structure/
. However, the HTML serialization of
that document can currently be retrieved from the URL https://tdwg.github.io/ac/structure/
and in the future that document might be made available at different URLs in
other formats such as PDF. It is
required that the IRI of the abstract resource be stable and unchanged, but
there is no requirement that the retrieval URL for a serialization stay the
same over time. Thus it's important that
citations and bookmarks be set to the permanent IRI of the resource, and that redirection
from the permanent IRI to the retrieval URL be maintained so that people can
actually acquire a copy of the resource using a browser.
In the past, obscure, deprecated Darwin Core terms simply
didn't dereference.In the test system,
they redirect programmatically to a URL that is the term IRI plus
".htm".Here's an example:
The document that is retrieved is an HTML, human-readable
description of the term.
Historically, current Darwin Core terms redirected to the Darwin
Core Quick Reference page and that behavior has been maintained in the test
system.Here's an example:
The same is true with Audubon Core terms, whose IRIs
redirect to an appropriate place on the Audubon Core Term List document. The URLs of both the Audubon Core Term List
page and Darwin Core Quick Reference page have changed recently, reinforcing
the importance of citing the actual term IRIs rather than the redirected URLs.
TDWG Standards Documentation Specification version model (from Section 2.3)
Versions
Taking cues from Dublin Core and the W3C, the SDS describes
a version model that can be used to track versions of resources associated with
TDWG standards. For example,
dereferencing the Darwin Core vocabulary IRI http://rs.tdwg.org/dwc/ shows that
there are 19 versions: 18 previous version and a most recent version that
corresponds to the current Darwin Core vocabulary.
For vocabularies and term lists, the version IRIs are constructed by appending an ISO 8601 date after the
final slash and inserting "version/" before the terminal string.For example, the current Darwin Core vocabulary IRI is http://rs.tdwg.org/dwc/
and a version of the Darwin Core vocabulary is http://rs.tdwg.org/version/dwc/2015-03-27
.The current Darwin Core IRI-value term
list IRI is http://rs.tdwg.org/dwc/iri/ and a version of it is http://rs.tdwg.org/dwc/version/iri/2015-03-27
.(Although it wouldn't be necessary to
include the characters "version/" in the version IRI, doing so makes pattern
recognition for those IRIs much simpler.)
For documents, the version IRI is formed by simply appending
the ISO 8601 date after the trailing slash.(In the case of documents, IRI pattern recognition is less critical
since there aren't hierarchical levels below the level of the document. So
"version/" isn't inserted in the version IRI.)For example, the document http://rs.tdwg.org/sds/doc/specification/
has a version http://rs.tdwg.org/sds/doc/specification/2007-11-05 .
In the case of non-document resources, resolution of version
IRIs is fully implemented, since human-readable pages can be constructed programmatically for those
resources using data from the metadata database.However, since the human-readable versions of
standards documents are generally created manually and have idiosyncratic redirection
IRIs, version IRI resolution is currently only partially implemented.In the case of many standards documents, the location
of previous versions is not known or they are not yet available online.So for now, one can't explore older versions
of standards documents in the same way one can explore older versions of
vocabularies, term lists, and terms.
Summary
I've implemented a system of IRIs that are consistent with
the SDS and past practice of Darwin and Audubon Cores. Although the patterns I established aren't the only possible ones, they work well for facilitating pattern matching by a server that generates many of the documents programmatically, so I feel that the pattern system is sound.
This is the first in a series of posts about the TDWG Standards Documentation Specification (SDS), with special reference to how its implementation enables machine access to information about TDWG standards. In particular, the SDS makes it possible to acquire all available information about TDWG vocabularies, including all historical versions of terms. In this post, I'm going to describe the genesis of the SDS and how the practical experience of the TDWG community influenced the ultimate state of the specification.
Historical background
The original draft of the SDS was written in 2007 by Roger Hyam as part of the effort to modernize the TDWG standards development process. The original draft was focused on how human-readable documents should be formatted. The SDS remained in draft form for several years and during that time, new standards documents generally reflected the directives of that draft.
In 2013, a Vocabulary Management Task Group examined the status of the old TDWG Ontology and the experience of the community with the term change section of the Darwin Core Namespace Policy. The task group recommended that a new SDS be written with guidelines for the formatting of both human- and computer-readable documents, and that the Darwin Core Namespace Policy be used as the starting point for writing a specification describing how vocabularies should be maintained.
In 2014, I was asked to lead a task group to revise the SDS and to move it forward to the status of ratified standard. One advantage of returning to work on the specification after seven years had elapsed was that we had the benefit of experience from work with the Darwin Core standard and had learned several important lessons from that. Some of those lessons were about weaknesses in policies related to standards documents and some were process-oriented. Because of the interrelation between the documentation of standards and the processes of their development and maintenance, the parallel development of both the SDS and the Vocabulary Maintenance Specification (VMS) by the task group allowed the two specifications to be developed in a complementary fashion.
One of the key problems with the state of TDWG standards documents was that it was difficult to know which documents associated with a complex standard like Darwin Core were actually part of the standard, and which documents were ancillary documents that provided useful information about the standard, but that were not actually part of the standard. That distinction was important because changes to documents within a standard should be subject to a potentially rigorous process of review, while documents outside the standard could be changed at will. There was a similar problem with the idea expressed in the original SDS draft that certain documents that were part of a standard should be considered normative, while other documents that were part of the standard were not normative. If the status of "normative" were bestowed on an entire document, what did that mean for parts of that document such as examples, or mutable URLs? Did changing an example or URL require invoking a standards review process or could they just be changed or corrected at will?
To make matters worse, the final designation of documents that were considered authoritatively to be part of the standard was determined by which documents were included in a .zip file that was uploaded to the OJS instance that was managing the standards adoption process at the time. That made it virtually impossible for any layman to actually know whether a particular document was part of a standard or not.
In the Darwin Core Standard at that time, the RDF/XML representation of the vocabulary was designated as the normative document. That presented several problems. One problem was that the XML document was by its nature a machine-readable document, making it difficult for people to read and understand it. Another question involved the text, XML, and RDF guides that specified how the standard was to be implemented, but that were not considered "the normative document". Clearly those documents were required to comply with the standard, so shouldn't they be considered in some way normative? The problem was made worse by the fact that the RDF guide document minted an entire category of Darwin Core terms (the dwciri: terms having IRI values), but those terms weren't actually found in the normative RDF/XML document.
Defining the Darwin Core vocabulary as RDF/XML also anchored it in a serialization that was becoming less commonly used. With the ratification of RDF/Turtle and JSON-LD by the W3C as alternative machine-readable serializations, it made less sense to define Darwin Core specifically in RDF/XML.
During the time between the writing of the draft SDS in 2007 and the convening of the task group, there was also significant discussion in the community as to whether Darwin Core should be developed as a full ontology, or whether it should remain a simple "bag of terms" having minimal human-readable definitions. The first option would allow for greater expressiveness, but the second option would allow for the broadest possible use of the vocabulary.
Strategies of the Standards Documentation Specification
The problems outlined above led the task group to create a specification with several key features that addressed those problems.
The SDS also got rid of the idea that particular documents were normative. Any document that is part of a standard can contain parts that are normative and parts that are not. Each human-readable document will contain a statement in its introduction outlining what parts are normative and what parts are not (Section 3.2.1). This designation can be made by labeling certain parts as normative, or by rules such as "all parts are normative except sections labeled as 'example' in their subtitles".
The problem of serializations for standards and their parts was addressed by considering standards components to be abstract entities that can have multiple equivalent serializations (Section 2.1). For human-readable documents, it is irrelevant whether a document is in HTML, PDF, or Markdown format. It is desirable to make documents available in as many formats as possible as long as they contain substantially the same content. For machine-readable documents, there is no preferred serialization. It is required that a machine consuming any of the serializations should receive exactly the same information (Section 2.2.4). Again, the more available serializations the better as long as the abstract meaning of their content is the same.
The issue of enhancing vocabularies through added semantics was addressed by a "layered" approach that had been suggested in online discussion prior to the formation of the task group. All TDWG vocabularies will consist of a set of terms with basic properties that delineate their definition, label, and housekeeping metadata. This "basic" vocabulary can be used in a broad range of applications. Additional vocabularies could be constructed by adding components to the basic vocabulary, such as constraints and properties generating entailments (Section 4.4.2.2). Thus, there could eventually be several Darwin Core vocabularies, one consisting of only the basic components, and zero to many additional vocabularies consisting of the basic vocabulary plus "enhancement" components layered on top of the basic vocabulary. Because the nature of such enhancements could not be known in advance, the VMS contains a process for the development of vocabulary enhancements that includes use-case collection and implementation experience reports. (Section 4) At the present time, there aren't any additional enhanced vocabularies, but they could be created in the future if members of the community can show that those enhancements are needed to accomplish some useful purpose.
In the next post of this series, I'll discuss how these strategies resulted in the model for machine-readable metadata embodied in the final standards documentation specification.
I recently listened to an interview of Eben Upton on The Life Scientific podcast, where he talked about what lead to his development of the Raspberry Pi (RPi), a fully functioning computer that you can buy for as little as $5. The concept of a computer that was essentially disposable fascinated me, and I decided to get one to play with. Originally, I was going to get the cheapest model, but in order to use it, one needed to have a wireless keyboard (which I didn't have). Since I was hoping to run the computer entirely with junk that I had lying around the house, I opted instead to get the $35 model 3B, which has 4 USB 2 ports, a standard size HDMI connector, and an Ethernet connector in addition to built-in WiFi and Bluetooth. I was able to use a micro SD card, a mouse, and a keyboard that I already had, although I did have to pay about $15 more at WalMart to get an HDMI to VGA adapter in order to use an old monitor that I had stored down in the basement.
I was able to use an old iPad USB power supply to provide the power to the RPi, but it barely puts out the minimum required current, so I frequently see the little lightning bolt in the upper right of the screen indicating that the computer was being underpowered. At one point, I also used a junky USB cable and it caused the computer to infinitely re-boot until I replaced it with a better quality one.
One of the features that was very attractive to me was the apparent ease with which one could interface the RPi with external devices. The RPi 3B is about the size of a credit card (although much thicker due to the various ports sticking up out of the circuit board), and it has 40 pins sticking up on one side that serve as the general purpose input/output interface (GPIO). Many of those pins can be used either to send output to a device being controlled by the RPi, or to receive input from some kind of sensor. Other pins serve as ground connections or provide 3.3V or 5V power.
After the initial euphoria of successfully downloading the Linux OS (known as Raspbian) onto the micro SD card and booting the computer, I realized that I didn't have the stuff that I needed to actually do the interfacing. In the past, I would have just made a trip to Radio Shack to pick up the items I needed, but since there is no longer any store in Nashville that sells electronics components to consumers, I had to make a careful assessment of what I needed so that I could make a minimal number of purchases online and save on shipping. In the following section, I'll list the items that I decided I needed.
Useful stuff for interfacing the Raspberry Pi
One of the most basic things that anyone who wants to play with interfacing the RPi should have is a solderless breadboard. I already had one, so I didn't need to order one, but if you don't have one, you need to get it. The size isn't that important because we aren't going to be hooking up a lot of things. In this post, I'm going to assume that the reader knows how to use a breadboard. If not, just read about it online. It's not complicated.
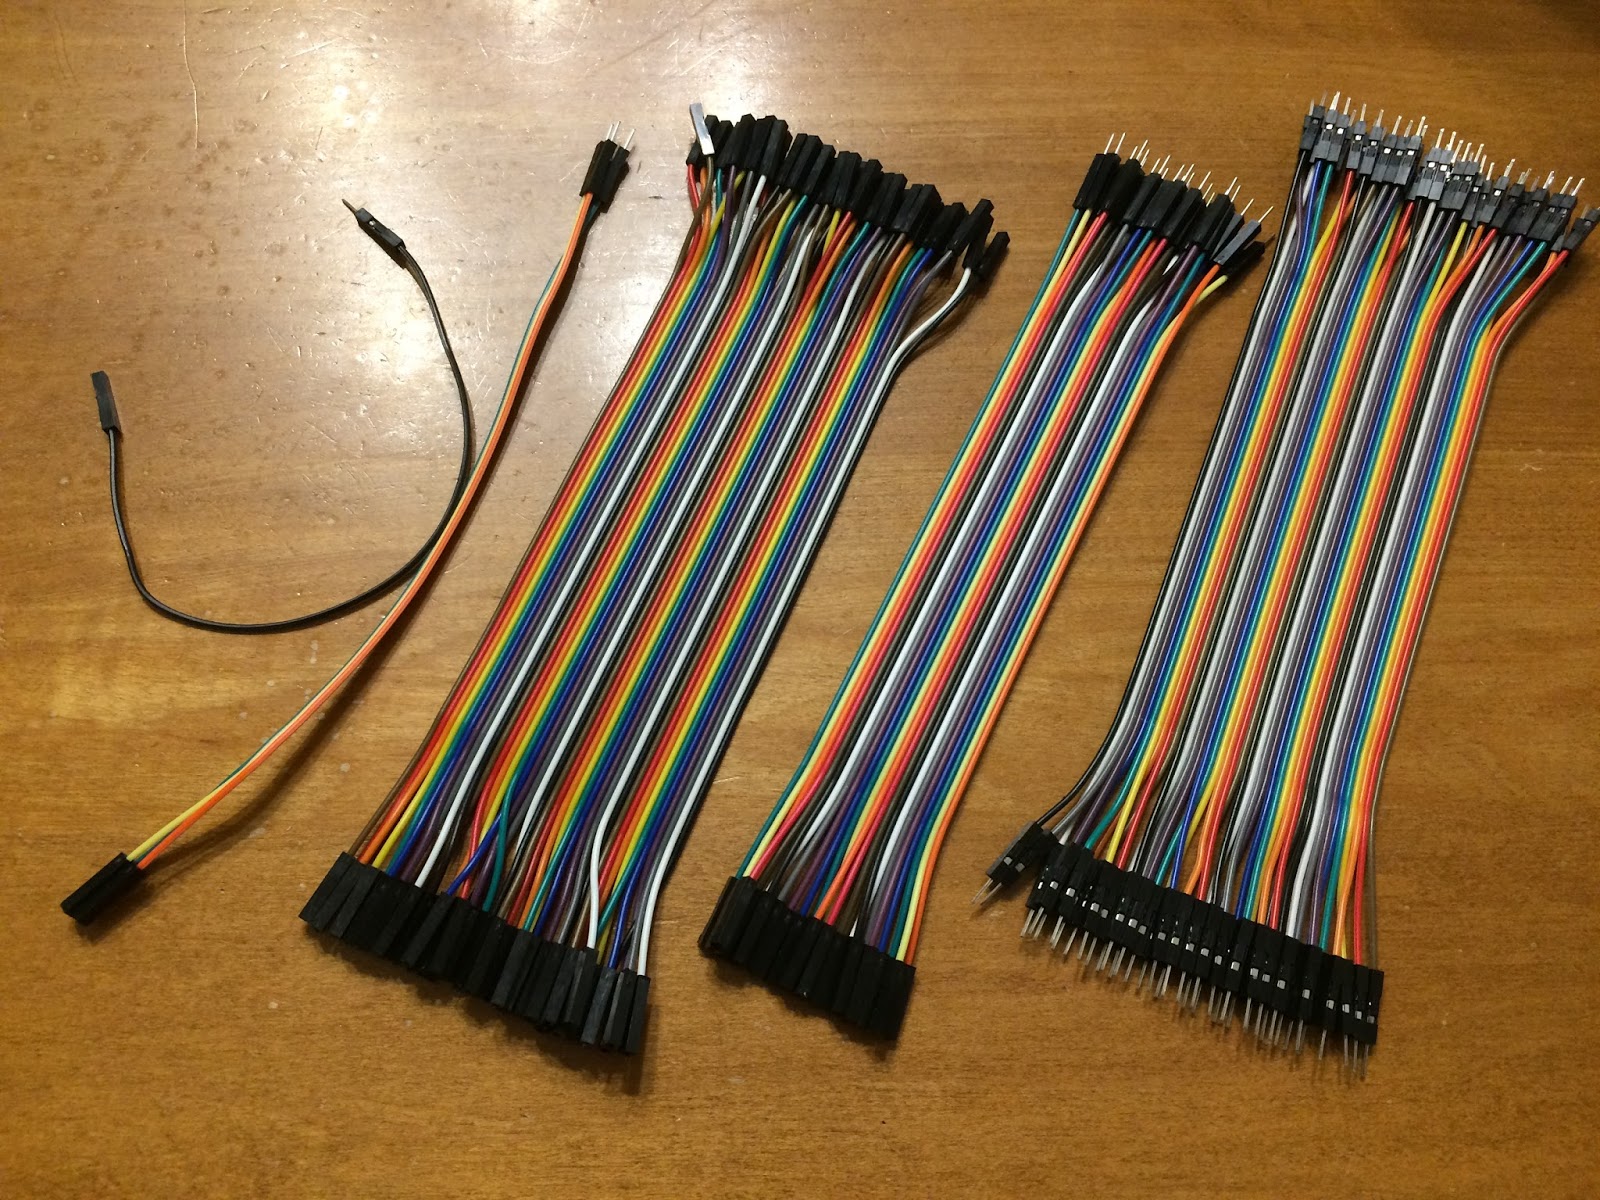
Another item that would be difficult to do without are some jumper wires. For $7, I found a set that had all three combinations of sockets and prongs. (All prices are in US dollars.) The ones I've used the most have a socket on one end (to fit over the GPIO pins) and a prong on the other end (to fit in a hole in the breadboard). For making shorter connections within the breadboard, I used short pieces of insulated solid wire. Wire cutters/strippers are very useful for preparing those wires.
One thing that you will hear repeatedly as you read about using the GPIO connections of the RPi is that you should never expose the pins to voltages over 3.3 volts, nor draw too much current from the power outputs or pins. The GPIO pins can output enough current to light an LED, or to turn a transistor on, but they can't handle outputting larger amounts of current, such as would be necessary to drive a motor or the coil of a relay. Because the pins shouldn't be exposed to voltages over 3.3 volts, they can't accept input from things like TTL chips that work at 5 volts. The solution in both of these cases is to use optoisolator (or optocoupler) chips. An optoisolator consists of an LED pointing at a phototransistor (effectively acting as a switch) inside an opaque package. The operative principle is that when the LED turns on, the transistor gets turned on, but without any direct electrical connection between the two circuits.
For output, the optoisolator LED is turned on by the GPIO interface and the controlled device is turned on by the phototransistor. For input, the optoisolator LED is turned on by the external sensor and the transistor is used to change the voltage present on the GPIO pin. This means that all kinds of bad things (such as over-voltaging or excessive current) can happen on the external side without having any effect on the Raspberry Pi. The worst-case scenario is that the optoisolator will get fried. Since they only cost me 35 cents each (a bag of 20 for $7), that's no big loss. The part number that I bought was AE1143, but there are probably others that are equivalent. However, if you want to use them in a breadboard, be sure that the ones you buy have a normal DIP package (see picture above) that will fit in the breadboard holes.
In order to actually turn stuff on and off, you need to have relays that can be turned on and off by the optoisolator. You could buy individual relays and the various electronic parts that need to go between them and the optoisolators, but I decided it would be simplest to just buy a board that had 8 single-pole, double-throw (SPDT) relays with most of the necessary circuitry already on board, including built-in optoisolators. You can also buy modules that have 4 or fewer relays, but they aren't much cheaper than the $10 I paid for this one. There are a bunch of places online that sell them and put their brand name on them, but it appears that they are all the same and made by the same manufacturer.
If the only thing you want to do is output, you don't need to buy the discrete optoisolators I described above since they are already included on this board. But if you also want to do input from sensors to the RPi, you should buy the separate optoisolators. (I'm not going to describe how to do input in this post, but it isn't very complicated.)
You can actually connect the relay module directly to the RPI GPIO pins via jumper wires, but for reasons that I'll get into later, it is probably better to buy a chip like ULN2803APG that has multiple Darlington transistor arrays and use it between the GPIO interface and the relay board. I bought a pack of two ULN2803APG chips for $5 - each chip can control 8 relays, so one chip is actually all you need to drive the relay module.
So if you already have a monitor, keyboard, USB power supply, etc. to hook up the computer, and if you already have a breadboard, your total cost to get off the ground with the RPi computer, relay module, and parts necessary to connect them is about $60 (plus whatever you have to pay for shipping).
Important issues relating to interfacing the Raspberry Pi
Although the Raspberry Pi provides a great opportunity for learning electronics, I already had enough experience with electronics that I wasn't really looking at this project as a means to increase my knowledge in that area. Mostly, I just wanted to turn things on and off with the minimal amount of effort. So of course, I started by googling topics related to interfacing an RPi.
Unfortunately, most of the results fell into two categories: questions asked by people who knew little or nothing about electronics that were answered by people who also didn't really know much about electronics, or highly technical questions asked by people who knew a lot about electronics that resulted in technical answers given by electrical engineers. Neither of these kinds of sources of information really told me what I wanted to know: the most straightforward way to safely turn things on and off using the RPi GPIO pins.
After consulting a number of online sources, I reached some conclusions, which I will summarize below. I should also say that I found the book "Exploring Raspberry Pi : Interfacing to the Real World with Embedded Linux" by Derek Molloy (John Wiley & Sons, Incorporated, 2016. ) very useful as a comprehensive reference. The book went far beyond where I was interested in going, but there were two sections that were particularly helpful. The general introduction to the GPIO (pgs. 220-223) and the introduction to digital input and output to powered circuits (pgs. 224-229) provided pretty much all of the technical details I needed to safely start interfacing without having to worry about frying the RPi.
Pins on the GPIO
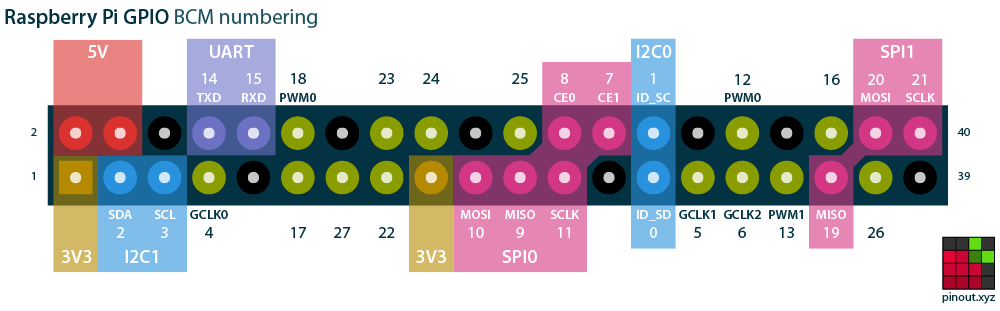
One of the most important details is knowing the purpose of the 40 pins of the GPIO. Fig. 6-1 (p. 221) of the Malloy book is probably the best diagram I've seen, but since I don't have permission to post it here, I'll instead include a diagram from https://pinout.xyz/
The orientation of the pins in this diagram correspond to the orientation shown in the close-up image of the RPi shown earlier in this post. There are two numbering systems for referring to the pins. One refers to the physical position of the pin. That system starts with 1 at the lower left, 2 at upper left, 3 lower 2nd column, 4 upper 2nd column, 5 lower 3rd column, etc. to pin 40 at the upper right. The other numbering system, which is probably more commonly used, is the "GPIO" number. I believe that this numbering system is consistent with earlier models of RPi that had fewer than 40 pins. In the diagram above, the GPIO numbers are shown above and below the pins (e.g. GPIO14 and GPIO15 in the upper row of pins, 4th and 5th pins from the left). In the default operating mode, any of these numbered GPIO pins can be used for input or output, with the exception of the ID_SD and ID_SC pins numbered 0 and 1 in this diagram. You should not connect anything to these pins unless you do further research into their function. Various pins can serve purposes (indicated by the color highlighting) other than general input and output when the GPIO is put into other modes, but that is beyond the scope of this post.
Power from the GPIO
In the diagram above, there are 12 pins that don't have GPIO numbers. The 8 black-colored pins are ground pins. They are all equivalent. The two red-colored pins labeled "5V" can provide power at 5 volts, and the two tan-colored pins labeled "3V3" can provide power at 3.3 volts. These pins provide a convenient source of power for things that you've connected to the GPIO pins, but they have a limited power output. Your circuit should not draw more than 200-300 mA from the 5 V source and should draw no more than 50 mA from the 3.3 V source.
You should make sure that when the RPi is turned off, there is no power being applied to the GPIO pins. That's not a problem if you are using only the built-in power supply from the 5.0 and 3.3 V pins because they'll power down when the RPi powers down. If your circuit needs more current than what the built-in power supply can provide, you should provide an external power supply. But it's best that such externally-powered circuits be electrically isolated on the other side of optoisolators anyway so that you don't have to worry about them accidentally applying power to the GPIO pins of the turned-off RPi. It is good to use the internal GPIO power pins only for parts of the circuit on the computer side of the optoisolators.
Turning on an LED with a GPIO pin
There are abundant examples on the web showing how to turn an LED on and off using one of the GPIO pins set in output mode. Essentially, when the GPIO pin is set to "on", it outputs 3.3 volts and when it is set to "off", it is at ground. To turn on and off an LED, you simply place an LED in series with a resistor and connect the ends to the GPIO pin and one of the ground pins. (If you put the LED in backwards, nothing bad happens - just turn it around and try again.) The resistance of the resistor should be low enough that the LED lights up enough to see, but not so low that the circuit draws more than 2-3 mA from the 3.3V output of the GPIO pin. A 1 k ohm resistor should be OK for that purpose. (If you are only turning on a single LED, you can make the LED brighter by using a smaller resistor and draw more than 3 mA from a GPIO pin. But you don't want to do that with multiple pins at once.) I chose to use GPIO pin 18 because it was conveniently located next to a ground pin.
There are a number of ways to use software to turn a GPIO pin on and off. Since I planned to use Python to write the controlling software, I imported a module called "gpiozero" that has a simple function for turning a GPIO pin on and off. (There are other more sophisticated Python modules for interacting with the GPIO, but that's beyond the scope of this post.) Here's the code:
from gpiozero import LED
from time import sleep
led18 = LED(18)
led18.on()
sleep(5)
led18.off()
The program makes GPIO18 go to 3.3 volts (turning the LED on), waits for 5 seconds, then makes GPIO18 go to 0 volts (turning the LED off). This was pretty exciting for about the first minute or so after I got it to work, but it wasn't really what I was trying to accomplish: turning any device on and off.
Wikimedia Commons, Optoisolator_Pinout.svg
However, if you look at the circuit diagram of an optoisolator, you can see that the left side is simply an LED. So the simple task of turning on an LED is really useful if that LED is inside an optoisolator. Following the example of Fig. 6-7 (p. 228) of the Malloy book, I connected pin 2 of the optoisolator to one of the GPIO ground pins, connected a resistor of about 2 k ohm to pin 1 of the optoisolator, and connected the other end of the resistor to the GPIO pin that I wanted to use to control the circuit (e.g. GPIO18). (Note: pin 1 is designated by a small dot on the top of the optoisolator DIP.) Based on Fig. 6-7, that should result in drawing a safe current of about 1 mA from the GPIO pin.
Turning something on and off with an optoisolator
The phototransistor side of the optoisolator is essentially a switch. When sufficient light comes from the LED inside the optoisolator, current flows from pin 3 to pin 4. When the LED is dark, no current flows. However, the amount of current that flows through the phototransistor is pretty small when the LED is lit with only 1 mA of current. So the phototransistor can be used to turn on another transistor in one of two ways:
Wikimedia Commons, left: Darlington_pair_diagram.svg CC BY-SA by user Michael9422, right: Compound_trans.svg
The transistor pair on the left is called a Darlington pair and the pair on the right is called a Sziklai pair. In both pairs, the transistor on the left (Q1) would represent the phototransistor inside the optoisolator. Instead of being controlled by current flowing into its base (B), Q1 is controlled by the light from the LED striking it. In the Darlington pair, Q2 is an NPN transistor, which is turned on by current flowing into its base. So when the phototransistor Q1 turns on, the small current flowing from it into the base of transistor Q2 is enough to saturate Q2, causing a lot of current to flow through Q2 from its collector (C) to its emitter (E). In the Sziklai pair, Q2 is a PNP transistor, which is turned on by current flowing out of its base. So when the phototransistor Q1 turns on, the small current flowing through it pulls enough current from the base of transistor Q2 to saturate Q2, causing a lot of current to flow through Q2 from its collector (C) to its emitter (E).
Either of these two configurations produces the same result: turning on the phototransistor in the optoisolator turns on a second transistor that can sink a lot more current. The current sunk by the second transistor is enough to turn on a small light, or to energize the coil of a relay. If the thing that you want to turn on and off is something that draws a lot of current, uses a voltage higher than about 5 volts, or uses alternating current, then you will need to use the second resistor to turn on a relay. A relay is a mechanical switch that is closed when its coil is energized. Since the switch is mechanical, it doesn't care about the nature of the electricity passing through it as long as the voltage and current don't exceed the maximum for which it is rated. So for example, if you want to turn the lights of your house on and off, you'll need a relay since the voltage is over 100 volts and is alternating current. (Note: I do NOT advise that you try this unless you are familiar with the safety hazards associated with household wiring. You can electrocute yourself if you make a mistake.) You also should use a relay if you want to control any kind of motor.
Turning the 8-relay module on and off
If you don't care about how the electronics work and just want to put the relay circuit together, skip this section.
This kind of setup is exactly what is built into the 8-relay module that I bought online. Sunfounder has a useful page that provides a helpful circuit diagram of the 8-relay module. From that page, you can download a large scale circuit diagram as well as a wiring diagram of the module. I've pulled out the circuit diagram for one of the relay modules:
If you compare this diagram to the ones above, you'll see that the central part of the circuit is a Darlington pair. The load that is turned on by the NPN transistor T5 is a relay, shown in the upper right of the diagram. When the coil is not energized, pin 1 of the relay is connected to pin 2. When the coil is energized, pin 1 is connected to pin 3 of the relay. Thus, the relay is a single pole, double throw (SPDT) switch. The diode D5 is there because when a coil is de-energized, its collapsing magnetic field can generate a surge of current that can damage the transistors, so the diode allows that current to safely dissipate.
According to what I've read online, you should be able to connect the input of the relay module directly to one of the GPIO pins and use it to turn the relay on and off. The "testing experiment" for Raspberry Pi on the Sunfounder page shows how to do this. But I would NOT recommend that you try that experiment for several reasons. The most obvious reason is that the photos on the web page do not show clearly how to connect the wires (some wires hide others, making it hard to tell what's going on). The other reason why following the pattern in that example is a bad idea is because it uses the Raspberry Pi's power supply to run everything. In their example, they get away with it, but if you are really planning to use the relay module to power 8 devices, you need to have a better understanding of how to make the connections in a safe way that doesn't risk over-voltaging or drawing too much current from the GPIO connections.
The first issue with the Sunfounder example circuit involves using the RPi's 5 volt power pin to run everything, including the LEDs shown on the circuit board. In real use, the load driven through the relays would be powered separately, using any possible voltage and current that the relays are rated for. The particular relays in the module say that they can handle up to 10 A, AC voltages up to 250 V, and DC voltages up to 30 V. For my testing, I connected a little battery-powered motor to pins 1 and 3 so that the motor would turn on and off. That circuit should have no connection to anything else on the circuit board.
The other issue is whether the voltage supply pins labeled "VCC" and "JD-VCC" should be tied together and supplied with a single power supply, or if they should be supplied with power separately. When the relay unit ships, it comes with a jumper that connects VCC and JD-VCC pins:
You should pull this jumper off the board and leave the two pins disconnected. If you want to connect them in the future, it should be a conscious decision on your part after considering the implications, but it should not happen by default. If you look at the circuit diagram above, you'll see that connecting VCC with JD-VCC defeats the purpose of even having the optoisolator in the circuit, since it makes an electrical connection between the circuits on its two sides.
The circuit diagram shows that JD-VCC supplies 5 volt power to the transistors and coils of the relays. When the relays aren't energized, the current is minimal, but when a single coil is energized, it draws about 65 mA. So if you were only going to use one of the 8 relays, you could easily use the 5 V power pin from the RPi GPIO pin set to supply the power. However, if you used three relays and they were routinely energized at the same time, you would be approaching the 200 mA limit of output for the 5 V GPIO power pin. Using all 8 relays would draw over 500 mA, which would probably either fry or at least crash the RPi. In addition, if like me you are running the RPi off of an iPad charger/power supply that barely provides enough current to run the RPi even without interfacing, you might crash the RPi with even fewer than 3 relays connected. A relatively simple solution is to just create your own battery-operated power supply using 4 D cells and a voltage regulator. That could easily run the relay unit for a pretty long time, and by being battery powered would enable you to use it in a robot without having to have a cord plugged into a wall receptacle. See the Appendix at the end for more on this.
The other problem with the relay board is that the inputs are "active low". That means that they are turned on when the GPIO pins are "off" (at ground = 0 V). To turn the relays off, the GPIO pins controlling them need to be "on" (3.3 V). Since the GPIO pins starting state is "off", that isn't really a good thing, because it means that the coils on the relay board would be energized as soon as the RPi is turned on - before you even start running the software to control it. It would be better to make the inputs be "active high" so that the coils would only be energized when you send a signal to make them be energized (i.e. turn the GPIO state to "on"). I became aware of this issue while reading a thread on the raspberrypi.org forum. I don't recommend reading the thread unless you are really hard-core, because the thread really gets out into the weeds and the suggested solution involves hooking up a bunch of discreet transistors and resistors to solve the problem.
There is actually much simpler solution that has been mentioned in several other places: using a ULN2803APG chip (the last item on the list of supplies that I bought for this project). You can view the data sheet for the ULN2803, but I'll cut to the chase by inserting the circuit diagram here:
You can ignore all of the resistors and diodes and just focus on the two transistors. If you compare this diagram with my earlier diagrams, you'll see that the ULN2803APG contains a Darlington pair. When the input of the ULN2803APG goes "high", current flows into the base of the transistor on the left, turning it on. Current flows from its emitter into the base of the second transistor, turning it on - effectively closing a switch that connects the output to ground, i.e. making the output "low". If the output is connected to the input of one of the relay controllers, it will ground the relay input, causing both the LED inside the optoisolator to turn on and the indicator LED on the relay circuit board to turn on.
When the input of the ULN2803APG goes low, both transistors turn off, disconnecting the output from the ground and allowing its voltage to float. If the output is connected to the input of one of the relay controllers, it will be at the VCC voltage and the optoisolator won't be turned on.
The combination of resistors inside the ULN2803APG was chosen so that the output goes low when the input exceeds 2.5 volts (just right for the GPIO output voltage of 3.3 V).
So essentially, the ULN2803APG chip flips the inputs of the relay board to make them active low rather than active high. That function is shown symbolically in the pinnout diagram for the ULN2803:
where the circuitry is summarized as "not" gates (changing low to high and high to low).
The wiring configuration is super simple. For each relay that you want to control, connect the output of the GPIO to one of the bottom pins on the chip (1 through 8), then connect the pin on the opposite side (11 through 18) to the input on the relay board that you want to control. The GND pin needs to be tied to one of the ground pins on the RPi and to the ground pin on the relay board. It does not seem to me that it should be necessary to connect the "COMMON" pin to anything, although in the examples I've seen it's been connected to VCC of the relay board. I don't think it matters, since under normal operation the diode on the common connection will block any current from flowing anyway.
The only remaining question is what power source to use for the VCC connection on the relay board. If one created an external 5 V power supply (such as the one I suggested using D batteries), that supply could be used. However, in the spirit of keeping the RPi completely isolated electrically from external circuits, it would probably be best to connect the VCC connection on the relay board to one of the 5 V power pins on the GPIO since the VCC connection supplies the computer side of the optoisolators. In my test circuit, I found that the ULN2803APG chip drew a negligible amount of current when connected by itself to the 5 V pin (as expected given the diode in the "common" connection inside the chip). When the VCC pin of the relay board was connected to the 5 V pin of the GPIO, it only drew about 1.3 mA per relay control circuit. So even if all 8 relays were in use, it would draw only about 10 mA from the 5 V pin - way below the 200 mA maximum "safe" output for that pin. I didn't actually measure the current being drawn from the GPIO control output pin, but I would imagine that it would be at a safe, low value since it is only turning on the transistors on the ULN2803APG, and not actually driving the optoisolator and status LEDs on the relay board as it would have been if there were a direct connection from the GPIO to the relay board.
After all of the stress I encountered trying to figure out a "safe" way to run the 8-relay module from the RPi GPIO, I'm pretty satisfied because this setup is both really simple to wire and also keeps the currents and voltages on the GPIO pins far below their safety limits. If a separate 5V supply is used to power the relay coils via JD-VCC (rather than using a 5 V power pin from the GPIO), the RPi is also completely isolated electrically from external circuits on the far side of the optoisolator.
Quick and dirty instructions for connecting the 8-relay board to the Raspberry Pi
It is best to make the initial connections with the RPi turned OFF in case you plug a wire in the wrong place during the setup.
1. Remove the jumper connecting the VCC and JD-VCC pins on the 8-relay board and leave it off.
2. Insert the ULN2803APG chip into your wireless breadboard.
3. Use a jumper wire to connect one of the ground pins from the GPIO (it doesn't matter which one) to the GND pin of the ULN2803APG chip.
4. Use a jumper wire to connect the GND pin of the ULN2803APG chip to the GND pin of the 8-relay board (it doesn't matter which GND pin).
5. Use a jumper wire to connect one of the 5 V pins on the Raspberry Pi's GPIO (it doesn't matter which of the 5 V pins) to the common pin of the ULN2803APG chip.
6. Use a jumper wire to connect the common pin of the ULN2803APG chip to a VCC pin on the 8-relay module (it doesn't matter which VCC pin).
7. Connect a jumper wire from the GPIO output pin that you want to use to one of the input pins on the ULN2803APG chip. If you want to use the code in my example, use GPIO18 (pin 12). Using pin 11 on the ULN2803APG chip would be sensible.
8. Connect a jumper wire from the corresponding output pin of the ULN2803APG chip to the input of the relay that you want to use on the 8-relay board. If you used ULN2803APG pin 11 in the last step, you should use pin 18 for the output pin.
9. Connect the JD-VCC pin on the 8-relay board to a 5 V source of power. If you just want to test the system with a single relay, you could connect it by a jumper to a 5 V power pin of the RPi's GPIO (or to the common pin of the ULN2803APG chip, which is itself connected to the 5 V pin). But don't do this if you are going to use more than 2 or 3 of the relays (see details above for the reason). In that case, buy or make a separate 5 V power supply to supply JD-VCC (see appendix).
10. Turn on the Raspberry Pi and your external 5 V power supply (if you used one).
11. Run the code snippet that I gave above if you are using Python (you must first have first imported the gpiozero module). For other programming languages, look up appropriate code on the web. If everything is working, you should see the indicator LED for your chosen relay turn on for 5 seconds, then turn off. If you listen carefully, you should also be able to hear a quiet clicking sound as the relay closes and opens.
12. If everything has worked up to this point, connect something that you want to turn on to the relays. You'll need a jeweler's screwdriver or some other small screwdriver to open the screw that clamps down on the output wires from the relay. A small, battery-powered motor is good for a test. Here's how it worked for me: https://twitter.com/baskaufs/status/963243621012123648
Froggy the Robot, take 1
Ever since I was a kid and read Andy Buckram's Tin Men (Carol Ryrie Brink, 1966), I always thought it would be really cool to build a robot. When I was in college, I had the opportunity to take a course that focused on digital electronics and we had fun in the class building burglar alarms and other cool stuff with TTL logic chips. So over the years, I accumulated various power supplies, chips, and other miscellaneous junk with the intention of actually building a robot some day.
About ten years ago when my two daughters were in middle school, I decided that the time was ripe for actually building the robot as a father-daughter project. Somewhere along the line, I acquired the plans for building an RS232 interface based on an AY-3-1015D Universal Asynchronous Receiver/Transmitter (UART) and the UART chip itself. The plan was to use the UART to communicate between a laptop's serial port and the robot, and use the UART data bit outputs to control relays on the robot. So after some soldering lessons for the girls, we started putting it together. I think I underestimated the patience of pre-teens for hours of soldering and ended up doing most of it myself, but I think they understood the basic principle of what we were building.
In the end, we had a little Visual Basic program with buttons that sent a number whose bits determined which relays should be turned on and off. Each bit of the output of the UART went through a 7404 TTL NOT chip (to prevent backwards frying of the UART chip and to invert the signal), and the output of the 7404 drove a PNP transistor in a manner very analogous to Sziklai pair discussed earlier in this post.
One difference between the relays that we used in our project and the relays that come on the 8-relay board is that the relays in our robot project were double pole, double throw (DPDT) rather than SPDT. The reason this was important to us was that we wanted to use the relays to be able to reverse the direction of the robot motors. See this diagram that I borrowed from quora.com:
When the switch contacts are thrown up, the positive side of the battery is connected to the + end of the motor and the motor rotates one way. When the switch contacts are thrown down, the positive side of the battery is connected to the - end of the motor and the motor runs the other way. This kind of reversing action could be mimicked by the SPDT relays of the 8-relay unit, but it would require using two of the relays in tandem (i.e. 2 relays to reverse one motor). It would also be tricky to avoid shorting the battery if the two switches didn't throw at exactly the same time.
Our robot was not very sophisticated - it just had 2 wheels whose direction could be controlled independently. When both wheels went forward, the robot went forward. When both went backwards, the robot went backwards. When one wheel went forwards and the other went backwards, the robot rotated in an appropriate direction (we had a third unpowered caster wheel to support the back side of the robot platform).
The most exciting feature of the robot was an old drawer from a CD drive (back in the days when they were motorized). With two more relays, we could power the drawer motor and control its direction (in or out). The out-and-in movement of the drawer reminded my daughters of a frog's tongue, so that's how the robot got the name "Froggy". In the end, my daughters created a game where a magnet hung from the end of the "tongue" and they could drive the robot around picking up small iron BBs scattered on the floor.
After the novelty wore off, Froggy was put away in a box. Between then and now, serial ports have virtually disappeared from computers, although I was able to get my old Dell laptop running long enough to make this video of the old Froggy in operation:
Froggy the Robot, take 2
When I decided to buy a Raspberry Pi, I knew immediately that one of my first projects would be to try to rebuild Froggy to be controlled directly by the RPi GPIO interface. All of the parts of Froggy's brain that ran the UART could be lobotomized, leaving the board with the relays and all of their connections to the motors. In the part of this diagram:
where the NOT gate was, I replaced it with the collector side (pin 3) of the phototransistor in one of the discrete optoisolators. Pin 4 was connected to a common ground with the coil. I was a bit concerned whether the phototransistor could sink enough current to light up the indicator LED as well as turning on the PNP transistor that drove the relay. But it had no problem with that, so I was rather quickly able to run the five control wires for the relays into the outputs of 5 optoisolators.
The most difficult part of making the conversion was to make a cable to connect Froggy to the RPi. When I ran Froggy with the RS232 interface, it only required two wires (a ground wire and the signal wire). I was able to splice together several old telephone cords to make Froggy's teather quite long. However, when controlling Froggy using the RPi, I needed a separate control wire for each of the five relays, plus a ground wire. Luckily, I was able to find an ancient ribbon cable that had been spliced to a multi-wire cable, which I had salvaged from some old piece of junk. It had only narrowly escaped being thrown out last summer when I cleaned out the basement. Unfortunately, there were more wires in the multi-wire cable than in the ribbon cable, and apparently some of the ribbon cable wires weren't actually connected to anything. So I had to spend over an hour with my ohmmeter trying to figure out which of wires at the two ends of the cable were actually connected to each other. Eventually, I had something like 10 usable wires in the cable - 6 for running Froggy now and some others for future expansion.
Here is the end result:
You can see the Python code that runs the Froggy controller in this gist.
Future projects
I probably won't devote a lot of energy to embellishments for Froggy. I may add one or more sensor buttons to the end of the tongue that will detect if the robot has run into something. In this post, I didn't go into how to accept input through the GPIO interface. It is much simpler than output and only requires 5 V power, an optoisolator, a resistor, and a switch. I may write another post if I get sensor buttons working.
What I really want to do is to figure out how to set up a web server on the RPi so that I can communicate with it through WiFi and the Internet. If I manage to do that, the RPi will just ride on Froggy with a portable power supply - no monitor, keyboard, or mouse required. If I get that to work, I could control the robot through a remote computer or perhaps my phone. We'll see if I ever get around to doing that!
Appendix
To run Froggy's onboard 5 V electronics, I just bought a little MC78LXXA 5 volt (positive) 0.1 A positive voltage regulator (TO-92 package). It was super-simple to hook it up. Here's a diagram of a different 5 V voltage regulator, but the concept is the same.
I bought a D cell holder that would hold 4 cells in series. At 1.5 V per cell, that's 6 volts. I connected the negative end of the cell holder to the ground pin of the voltage regulator and the positive end to the "+5.5V ... 16V" connection at the left side of the diagram. The "+5V" connection at the right serves as the regulated 5 V supply (with a common ground to the negative end of the battery holder. My data sheet says "Bypass Capacitors are recommended for optimum stability and transient response and should be located as close as possible." I actually just left them out and got away with it, although it probably would have been better to have put them in.
The MC78LXXA is rated for an output of 100 mA. I suspect that when I was driving all 5 of the relays, I might have gone over that, but it always was able to run the circuitry anyway. When the robot is at rest with no energized relays, I don't think that it is drawing more than about 10 mA. If you wanted to use the 4 D cell system to provide power to the 8 relay module, I think you could just use a 5 volt regulator with a higher current output rating. For example, I googled and found a μA7805CKC regulator in a TO-220 package that is rated at 1.5 A. That would easily provide the 500 mA that I estimated was required when all 8 relays on the module were energized, with 1000 mA to spare.