Note added 2021-03-13: Although this post is still relevant for understanding some of the basic ideas about writing to a Wikibase API (including Wikidata's), I have written another series of blog posts showing (with lots of screenshots and handholding) how you can safely write your own data to the Wikidata API using data that is stored in simple CSV spreadsheets. See this post for details.
 |
| Image from Wikimedia Commons; licensing murky but open |
What do I mean by "putting data into Wikidata"?
I have two confessions to make right at the start. To some extent, the title of this post is misleading. What I am actually going to talk about is putting data into Wikibase, which isn't exactly the same thing as Wikidata. I'll explain about that in a moment. The second confession is that if all you really want are the technical details of how to write to Wikibase/Wikidata and the do-it-yourself scripts, you can just skip reading the rest of this post and go directly to a web page that I've already written on that subject. But hopefully you will read on and try the scripts after you've read the background information here.
Wikibase is the underlying application upon which Wikidata is built. So if you are able to write to Wikibase using a script, you are also able to use that same script to write to Wikidata. However, there is an important difference between the two. If you create your own instance of Wikibase, it is essentially a blank version of Wikidata into which you can put your own data, and whose properties you can tweak in any way that you want. In contrast, Wikidata is a community-supported project that contains data from many sources, and which has properties that have been developed by consensus. So you can't just do whatever you want with Wikidata. (Well, actually you can, but your changes might be reverted and you might get banned if you do things that the community considers bad.)
So before you start using a script to mess with the "real" Wikidata, it's really important to first understand the expectations and social conventions of the Wikidata community. Although I've been messing around with scripting interactions with Wikibase and Wikidata for months, I have not turned a script loose on the "real" Wikidata yet because I still have some work to do to meet the community expectations.
Before you start using a script to make edits to the real Wikidata, at a minimum you need to do the following:
If you are only thinking about using a script to write to your own instance of Wikibase, you can ignore the steps above and just hack away. The worse case scenario is that you'll have to blow the whole thing up and start over, which is not that big of a deal if you haven't yet invested a lot of time in loading data.
We can see the various pieces of Wikibase by looking its Docker Compose YAML file. Here are some of them:
When data are entered into Wikibase using the Mediawiki instance at port 8181, they are stored in the mysql database. The Wikidata Query Service updater checks periodically for changes in the database. When it finds one, it loads the changed data into the Blazegraph triplestore. Although one can access the Blazegraph interface directly through port 8989, accessing the triplestore indirectly through the Wikidata Query Service frontend on port 8282 gives some additional bells and whistles that make querying easier.
If I look at the terminal window while Docker Compose is running Wikidata, I see this:

You can see that the updater is looking for changes every 10 seconds. This goes on in the terminal window as long as the instance is up. So when changes are made via Mediawiki, they show up in the Query Service within about 10 seconds.
If you access Blazegraph via http://localhost:8989/bigdata/, you'll see the normal GUI that will be familiar to you if you've used Blazegraph before:

The API allows you to perform many possible read or write actions on a MediaWiki installation. Those actions are listed on the MediaWiki API help page and you can learn their details by clicking on the name of any of the actions. The actions whose names begin with "wb" are the ones specifically related to Wikibase and there is a special page that focuses only on that set of actions. Since this post is related to Wikibase, we will focus on those actions. Although a number of the Wikibase-related actions can read from the API, as I pointed out in my most recent previous post there is not much point in reading directly from the API when one can just use Wikibase's awesome SPARQL interface instead. So in my opinion, the most important Wikibase actions are the ones that write to the API rather than read.
The Wikibase-specific API page makes two important points about writing to a Wikibase instance: writing requires a token (more on that later) and must be done using an HTTP POST request. I have to confess that when I first started looking at the API documentation, I was mystified about how to translate the examples given there into request bodies that could be sent as part of a POST request. But there is a very useful tool that makes it much easier to construct the POST requests: the API sandbox. There are actually multiple sandboxes (e.g. real Wikidata, Wikidata test instance, real Wikipedia, Wikipedia test instance, etc.), but since tests that you do in an API sandbox cause real changes to their corresponding MediaWiki instances, you should practice using the Wikidata test instance sandbox (https://test.wikidata.org/wiki/Special:ApiSandbox) and not the sandbox for the real Wikidata, which looks and behaves exactly the same as the test instance sandbox.

When you go to the sandbox, you can select from the dropdown the action that you want to test. Alternatively, you can click on one of the actions on the MediaWiki API help page, then in the Examples section, click on the "[open in sandbox]" link to jump directly to the sandbox with the parameters already filled into the form.

Click on the "action=..." link in the menu on the left if needed to enter any necessary parameters. Note: since testing the write actions requires a token, you need to log in (same credentials as Wikipedia or any other Wikimedia site), then click the "Auto-fill the token" button before the write action will really work. Once the action has taken place, you can go to the edited entry in the test Wikidata instance and convince yourself that it really worked.
On the sandbox page, clicking on the "Results" link in the menu on the left will provide you with a really useful piece of information: the Request JSON that needs to be sent to the API as the body of the POST request:

Drop down the "Show request data as:" list to "JSON" and you can copy the Request JSON to use as you write and test your bot script. Once you've had a chance to look at several examples of request JSON, you can then compare it to the information given on the various API help pages to understand better what exactly you need to send to the API as the body of your POST request.
The actual process of getting the necessary token is a bit convoluted an I won't go into the details here since they are covered in detail (with screenshots) on another web page in the Set up the bot and Use the bot to write to the Wikidata test instance sections. The abridged version is that you first need to create a bot username and password, then use those credentials to interact with the API to get the CSRF token that will allow you to perform the POST request.
For use in the test Wikidata instance or in your own Wikibase installation, you can just create the bot password using your own personal account. (Note: "bot" is just MediaWiki lingo for a script that automates edits.) However, the guidelines for getting approval for a Wikidata bot say that if you want to create a bot that carries out manipulations of the real Wikidata, you need to create a separate account specifically for the bot. An approved bot will receive a "bot flag" indicating that the community has given a thumbs-up to the bot to carry out its designated tasks. In the practice examples I've given, you don't need to do that, so you can ignore that part for now.
A CSRF token is issued for a particular editing session, so once it has been issued, it can be re-used for many actions that are carried out by the bot script during that session. I've written a Python function, authenticate(), that can be copied from this page and used to get the CSRF token - it's not necessary to understand the details unless you care about that kind of thing.
The Wikibase/DataModel reference page defines snaks as: "the basic information structures used to describe Entities in Wikidata. They are an integral part of each Statement (which can be viewed as collection of Snaks about an Entity, together with a list of references)." But what exactly does that mean?
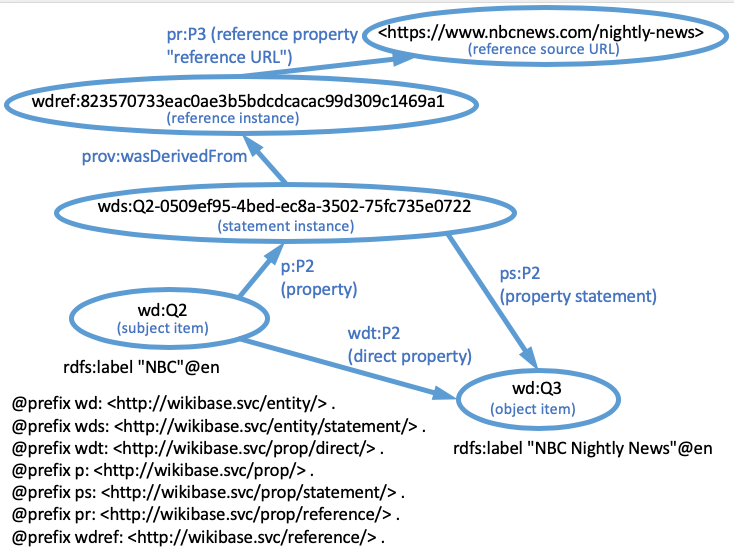
Truthfully, I find the reference page a tough slog, so if you are unfamiliar with the Wikidata model and want to get a better understanding of it, I would recommend starting with the Data Model Primer page, which shows very clearly how the data model relates to the familiar MediaWiki item entry GUI (but ironically does not mention snaks anywhere on the entire page). I would also recommend studying the following graph diagram, which comes from a page that I wrote to help people get started making more complex Wikibase/Wikidata SPARQL queries.
Before I talk about how snaks fit into the Wikibase data model, I want to talk briefly about how the Wikibase modeling approach differs from modeling more typical for RDF-based Linked Data. A typical RDF-based graph model is built upon the RDFS, which includes an implicit notion of classes and type. One could then build a model on top of RDFS by creating an ontology where class relationships are define using subclass statements, restrictions are placed on class membership, ranges and domains are defined, etc. The overall goal is to describe some model of the world (real or imagined).
In contrast to that, a basic principle of Wikibase is that it is not about the truth. Rather, the Wikibase model is based on describing statements and their references. So the Wikibase model does not assume that we can model the world by placing items in a class. Rather, the Wikibase model allows us to state that "so-and-so says" that an item is a member of some class. A key property in Wikidata is P31 ("instance of"), which is used with almost every item to document a statement about class membership. But there is no requirement that some other installation of Wikibase have an "instance of" property, or that if an "instance of" property exists its identifier must be P31. "Instance of" is not an idea that's "baked into" the Wikibase model in the way it's build into RDFS. "Instance of" is just one of the many properties that the Wikidata community has decided it would like to use in statements that it documents. The same is true of "subclass of" (P279). A user can create the statement Q6256 P279 Q1048835 ("country" "subclass of" "political territorial entity"), but according to the Wikibase model, that is not some kind of special assertion of the state of reality. Rather, it's just one of the many other statements about items that have been documented in the Wikidata knowledge base.
So when we say that some part of the Wikidata community is "building a model" of their domain, they aren't doing it by building a formal ontology using RDF, RDFS, or OWL. Rather, they are doing it by making and documenting statements that involve the properties P31 and P279, just as they would make and document statements using any of the other thousands of properties that have been created by the Wikidata community.
What is actually "baked into" the Wikibase model (and Wikidata by extension) are the notions of property/value pairs associated with statements, reference property/value pairs associated with statements, and qualifiers and ranks for statements (not shown in the diagram above). The Wikibase data model assumes that the properties associated with statements and references exist, but does not define any of them a priori. Creating those particular properties are is up to the implementers of a particular Wikibase instance.
These key philosophical differences between the Wikibase model and the "standard" RDF/RDFS/OWL world need to be understood by implementers from the Linked Data world who are interested in using Wikibase as a platform to host their data. Building a knowledge graph on top of Wikibase will automatically include notions of statements and reference, but it will NOT automatically include notions of class membership and subclass relationships. Those features of the model will have to be built by the implementers through creation of appropriate properties. It's also possible to use SPARQL Construct to translate a statement in Wikidata lingo like
Q42 P31 Q5.
into a standard RDF/RDFS statement like
Q42 rdf:type Q5.
although there are OWL-related problems with this approach related to an item being used as both a class and an instance. But that's way beyond the scope of this post.
So after that rather lengthy aside, let's return to the question of snaks. A somewhat oversimplified description of a snak would be to say that it's a property/value pair of some sort. (There are also less commonly "no value" and "some value" snaks in cases where particular values aren't known - you can read about their details on the reference page.) The exact nature of the snak will depend on whether the value is a string, an item, or some other more complicated entity like a date range or geographic location. "Main" snaks are property/value pairs that are associated directly with the subject item and "qualifier" snaks qualify the statement made by the main snak. Zero to many reference records are linked to the statement, and each reference record has its own set of property/value snaks describing the reference itself (as opposed to describing the main statement). Given that the primary concern of the Wikibase data model is documenting statements involving property/value pairs, snaks are a central part of that model.
The reason I'm going out into the weeds on the subjects of snaks in this post is that a basic knowledge of snaks is required in order to understand the lingo of the Wikibase actions described in the MediaWiki API help. For example, if we look at the help page for the wbcreateclaim action, we can see how a knowledge of snaks will help us better understand the parameters required for that action.

In most cases, snaktype will have a value of value (unless you want to make a "no value" or "some value" assertion). If we want to write a claim having a typical snak, we will have to provide the API with values for both the property and value parameters. The property parameter is straightforward: the property's "P" identifier is simply given as the value of the parameter.
The value of the snak is more complicated. Its value is a string that also includes the delimiters necessary to describe the particular kind of value that's appropriate for the property. If the property is supposed to have a string value, then the value of the value parameter will be the string enclosed in quotes. If the property is supposed to have an item as a value, then the information about the item is given as a string that includes all of the JSON delimiters (quotes, colons, curly braces, etc.) required in the API documentation. Since all of the parameters and values for the action will be passed to the API as JSON in the POST request, the value of the value parameter will end up as a JSON string inside of JSON. Depending on the programming language you use, you may have to use escaping or some other mechanism to make sure that the JSON string for the value value is rendered properly. Here are some examples of how part of the POST request body JSON might look in a programming language where escaping is done by preceding a character with a backslash:
if the value is a string:
{
...
"property": "P1234",
"value": "\"WGS84\"",
...
}
if the value is an item:
{
...
"property": "P9876",
"value": "{\"entity-type\":\"item\",\"numeric-id\":1}",
...
}
Because the quotes that are part of the value parameter value string are inside the quotes required by the request body JSON, they were escaped as \".
For JSON data sent by the requests Python library as the body of a POST request, the JSON can be passed into the .post() method as a dictionary data structure, and requests will turn the dictionary into JSON before sending it to the API. To some extent, that allows one to dodge the whole escaping thing by using a combination of single and double quotes when constructing the dictionary. So in Python, we could code the dictionary to be passed by requests like this:
if the value is a string:
{
...
'property': 'P1234',
'value': '"WGS84"',
...
}
if the value is an item:
{
...
'property': 'P9876',
'value': '{"entity-type":"item","numeric-id":1}',
...
}
since Python dictionaries can be defined using using single quotes. Other kinds of values such as geocoordinates will have a different structure for their value string.
I ran into problems in Python when I tried to build the value values for the POST body dictionary by directly concatenating string variables with literals containing curly braces. Since Python uses curly braces to define string replacement fields, it got confused and threw an error in some of my lines of code. The simplest solution to that problem was to construct a dictionary for the data that needed to be turned into a string value, then pass that dictionary into the json.dumps() function to turn the dictionary into a valid JSON string (rather than trying to build that string directly). The string resulting as output of json.dumps() could then be assigned as the value of the appropriate parameter to be included in the JSON sent in the POST body. You can see how I used this approach in lines 128 through 148 of this script.
I realize that what I've just described here is about as confusing as trying to watch the movie Inception for the first time, but I probably wasted at least half of the time it took me to get my bot script to work by being confused about what a snak was and how to construct the value of the value parameter. So at least you will have a heads up about this confusing topic, and by looking at my example code you will hopefully be able to figure it out.
This tutorial will walk you through the steps and provides code examples and screenshots to get you going.
If you are writing to the "real" Wikidata instance of Wikibase, you need to take several additional steps:
The Wikidata:Bots page gives many of the necessary administrative details of setting up a Wikidata bot.
For writing to the "real" Wikidata, you might consider using the Pywikibot Python library to build your bot. I've written a tutorial for that here. Pywikibot has built-in throttling, so that takes care of potential problems with hitting the API at an unacceptable rate. However, in tests that I carried out on our test instance of Wikibase hosted on AWS, writing directly to the API as I've described here was about 60 times faster than using Pywikibot. So if you are writing a lot of data to a fresh and empty Wikibase instance, you may find using Pywikibot's slow speed frustrating.
Before you start using a script to make edits to the real Wikidata, at a minimum you need to do the following:
- read the MediaWiki API Etiquette page
- study and understand the information on the Maxlag parameter
- understand the bot approval process and follow the guidelines for creating and operating a Wikidata bot
- test your script extensively on the Wikidata test instance
If you are only thinking about using a script to write to your own instance of Wikibase, you can ignore the steps above and just hack away. The worse case scenario is that you'll have to blow the whole thing up and start over, which is not that big of a deal if you haven't yet invested a lot of time in loading data.
Some basic background on Wikibase
Although we tend to talk about Wikibase as if it were a single application, it actually consists of several applications operating together in a coordinated installation. This is somewhat of a gory detail that we can usually ignore. However, having a basic understanding the structure of Wikidata will help us to understand why we even though Wikidata supports Linked Data, we have to write to Wikidata through the MediaWiki API. (Full disclosure: I'm not an expert on Wikibase and what I say here is based on the understanding that I have gained based on my own explorations.)We can see the various pieces of Wikibase by looking its Docker Compose YAML file. Here are some of them:
- a mysql database
- a Blazegraph triplestore backend (exposed on port 8989)
- the Wikidata Query Service frontend (exposed on port 8282)
- the Mediawiki GUI and API (exposed on port 8181)
- a Wikidata Query Service updater
- Quickstatements (which doesn't work right out of the box, so we'll ignore it)
When data are entered into Wikibase using the Mediawiki instance at port 8181, they are stored in the mysql database. The Wikidata Query Service updater checks periodically for changes in the database. When it finds one, it loads the changed data into the Blazegraph triplestore. Although one can access the Blazegraph interface directly through port 8989, accessing the triplestore indirectly through the Wikidata Query Service frontend on port 8282 gives some additional bells and whistles that make querying easier.
If I look at the terminal window while Docker Compose is running Wikidata, I see this:

You can see that the updater is looking for changes every 10 seconds. This goes on in the terminal window as long as the instance is up. So when changes are made via Mediawiki, they show up in the Query Service within about 10 seconds.
If you access Blazegraph via http://localhost:8989/bigdata/, you'll see the normal GUI that will be familiar to you if you've used Blazegraph before:

However, if you go to the UPDATE tab and try to add data using SPARQL Update, you'll find that it's disabled. That means that the only way to actually get data into the system is through the Mediawiki GUI or API exposed through port 8181, and NOT through the standard Linked Data mechanism of SPARQL Update. So if you want to add data to Wikibase (either your local installation or the Wikidata instance of Wikibase), you need to figure out how to use the Mediawiki API, which is based on a specific Wikimedia data model and NOT on standard RDF or RDFS.
The MediaWiki API
The MediaWiki API is a generic web service for all installations in the WikiMedia universe. That includes not only familiar Wikimedia Foundation projects like Wikipedia in all of its various languages, Wikimedia Commons, and Wikidata, but also any of the many other projects built on the open source MediaWiki platform.The API allows you to perform many possible read or write actions on a MediaWiki installation. Those actions are listed on the MediaWiki API help page and you can learn their details by clicking on the name of any of the actions. The actions whose names begin with "wb" are the ones specifically related to Wikibase and there is a special page that focuses only on that set of actions. Since this post is related to Wikibase, we will focus on those actions. Although a number of the Wikibase-related actions can read from the API, as I pointed out in my most recent previous post there is not much point in reading directly from the API when one can just use Wikibase's awesome SPARQL interface instead. So in my opinion, the most important Wikibase actions are the ones that write to the API rather than read.
The Wikibase-specific API page makes two important points about writing to a Wikibase instance: writing requires a token (more on that later) and must be done using an HTTP POST request. I have to confess that when I first started looking at the API documentation, I was mystified about how to translate the examples given there into request bodies that could be sent as part of a POST request. But there is a very useful tool that makes it much easier to construct the POST requests: the API sandbox. There are actually multiple sandboxes (e.g. real Wikidata, Wikidata test instance, real Wikipedia, Wikipedia test instance, etc.), but since tests that you do in an API sandbox cause real changes to their corresponding MediaWiki instances, you should practice using the Wikidata test instance sandbox (https://test.wikidata.org/wiki/Special:ApiSandbox) and not the sandbox for the real Wikidata, which looks and behaves exactly the same as the test instance sandbox.

When you go to the sandbox, you can select from the dropdown the action that you want to test. Alternatively, you can click on one of the actions on the MediaWiki API help page, then in the Examples section, click on the "[open in sandbox]" link to jump directly to the sandbox with the parameters already filled into the form.

Click on the "action=..." link in the menu on the left if needed to enter any necessary parameters. Note: since testing the write actions requires a token, you need to log in (same credentials as Wikipedia or any other Wikimedia site), then click the "Auto-fill the token" button before the write action will really work. Once the action has taken place, you can go to the edited entry in the test Wikidata instance and convince yourself that it really worked.
On the sandbox page, clicking on the "Results" link in the menu on the left will provide you with a really useful piece of information: the Request JSON that needs to be sent to the API as the body of the POST request:

Drop down the "Show request data as:" list to "JSON" and you can copy the Request JSON to use as you write and test your bot script. Once you've had a chance to look at several examples of request JSON, you can then compare it to the information given on the various API help pages to understand better what exactly you need to send to the API as the body of your POST request.
Authentication
In the last section, I mentioned that all write actions required a token. So what is that token, and how do you get it? In the API sandbox, you just click on a button and magic happens: a token is pasted into the box on the form. But what do you do for a real script?The actual process of getting the necessary token is a bit convoluted an I won't go into the details here since they are covered in detail (with screenshots) on another web page in the Set up the bot and Use the bot to write to the Wikidata test instance sections. The abridged version is that you first need to create a bot username and password, then use those credentials to interact with the API to get the CSRF token that will allow you to perform the POST request.
For use in the test Wikidata instance or in your own Wikibase installation, you can just create the bot password using your own personal account. (Note: "bot" is just MediaWiki lingo for a script that automates edits.) However, the guidelines for getting approval for a Wikidata bot say that if you want to create a bot that carries out manipulations of the real Wikidata, you need to create a separate account specifically for the bot. An approved bot will receive a "bot flag" indicating that the community has given a thumbs-up to the bot to carry out its designated tasks. In the practice examples I've given, you don't need to do that, so you can ignore that part for now.
A CSRF token is issued for a particular editing session, so once it has been issued, it can be re-used for many actions that are carried out by the bot script during that session. I've written a Python function, authenticate(), that can be copied from this page and used to get the CSRF token - it's not necessary to understand the details unless you care about that kind of thing.
Time for a Snak
You can't get very far into the process of performing Wikibase actions on the MediaWiki API before you start running into the term snak. Despite reading various Wikibase documents and doing some minimal googling, I have not been able to find out the origin of the word "snak". I suppose it is either an inside joke, a term from some language other than English, or an acronym. If anybody out there knows, I would love to be set straight on this.The Wikibase/DataModel reference page defines snaks as: "the basic information structures used to describe Entities in Wikidata. They are an integral part of each Statement (which can be viewed as collection of Snaks about an Entity, together with a list of references)." But what exactly does that mean?
Truthfully, I find the reference page a tough slog, so if you are unfamiliar with the Wikidata model and want to get a better understanding of it, I would recommend starting with the Data Model Primer page, which shows very clearly how the data model relates to the familiar MediaWiki item entry GUI (but ironically does not mention snaks anywhere on the entire page). I would also recommend studying the following graph diagram, which comes from a page that I wrote to help people get started making more complex Wikibase/Wikidata SPARQL queries.
Before I talk about how snaks fit into the Wikibase data model, I want to talk briefly about how the Wikibase modeling approach differs from modeling more typical for RDF-based Linked Data. A typical RDF-based graph model is built upon the RDFS, which includes an implicit notion of classes and type. One could then build a model on top of RDFS by creating an ontology where class relationships are define using subclass statements, restrictions are placed on class membership, ranges and domains are defined, etc. The overall goal is to describe some model of the world (real or imagined).
In contrast to that, a basic principle of Wikibase is that it is not about the truth. Rather, the Wikibase model is based on describing statements and their references. So the Wikibase model does not assume that we can model the world by placing items in a class. Rather, the Wikibase model allows us to state that "so-and-so says" that an item is a member of some class. A key property in Wikidata is P31 ("instance of"), which is used with almost every item to document a statement about class membership. But there is no requirement that some other installation of Wikibase have an "instance of" property, or that if an "instance of" property exists its identifier must be P31. "Instance of" is not an idea that's "baked into" the Wikibase model in the way it's build into RDFS. "Instance of" is just one of the many properties that the Wikidata community has decided it would like to use in statements that it documents. The same is true of "subclass of" (P279). A user can create the statement Q6256 P279 Q1048835 ("country" "subclass of" "political territorial entity"), but according to the Wikibase model, that is not some kind of special assertion of the state of reality. Rather, it's just one of the many other statements about items that have been documented in the Wikidata knowledge base.
So when we say that some part of the Wikidata community is "building a model" of their domain, they aren't doing it by building a formal ontology using RDF, RDFS, or OWL. Rather, they are doing it by making and documenting statements that involve the properties P31 and P279, just as they would make and document statements using any of the other thousands of properties that have been created by the Wikidata community.
What is actually "baked into" the Wikibase model (and Wikidata by extension) are the notions of property/value pairs associated with statements, reference property/value pairs associated with statements, and qualifiers and ranks for statements (not shown in the diagram above). The Wikibase data model assumes that the properties associated with statements and references exist, but does not define any of them a priori. Creating those particular properties are is up to the implementers of a particular Wikibase instance.
These key philosophical differences between the Wikibase model and the "standard" RDF/RDFS/OWL world need to be understood by implementers from the Linked Data world who are interested in using Wikibase as a platform to host their data. Building a knowledge graph on top of Wikibase will automatically include notions of statements and reference, but it will NOT automatically include notions of class membership and subclass relationships. Those features of the model will have to be built by the implementers through creation of appropriate properties. It's also possible to use SPARQL Construct to translate a statement in Wikidata lingo like
Q42 P31 Q5.
into a standard RDF/RDFS statement like
Q42 rdf:type Q5.
although there are OWL-related problems with this approach related to an item being used as both a class and an instance. But that's way beyond the scope of this post.
So after that rather lengthy aside, let's return to the question of snaks. A somewhat oversimplified description of a snak would be to say that it's a property/value pair of some sort. (There are also less commonly "no value" and "some value" snaks in cases where particular values aren't known - you can read about their details on the reference page.) The exact nature of the snak will depend on whether the value is a string, an item, or some other more complicated entity like a date range or geographic location. "Main" snaks are property/value pairs that are associated directly with the subject item and "qualifier" snaks qualify the statement made by the main snak. Zero to many reference records are linked to the statement, and each reference record has its own set of property/value snaks describing the reference itself (as opposed to describing the main statement). Given that the primary concern of the Wikibase data model is documenting statements involving property/value pairs, snaks are a central part of that model.
The reason I'm going out into the weeds on the subjects of snaks in this post is that a basic knowledge of snaks is required in order to understand the lingo of the Wikibase actions described in the MediaWiki API help. For example, if we look at the help page for the wbcreateclaim action, we can see how a knowledge of snaks will help us better understand the parameters required for that action.

In most cases, snaktype will have a value of value (unless you want to make a "no value" or "some value" assertion). If we want to write a claim having a typical snak, we will have to provide the API with values for both the property and value parameters. The property parameter is straightforward: the property's "P" identifier is simply given as the value of the parameter.
The value of the snak is more complicated. Its value is a string that also includes the delimiters necessary to describe the particular kind of value that's appropriate for the property. If the property is supposed to have a string value, then the value of the value parameter will be the string enclosed in quotes. If the property is supposed to have an item as a value, then the information about the item is given as a string that includes all of the JSON delimiters (quotes, colons, curly braces, etc.) required in the API documentation. Since all of the parameters and values for the action will be passed to the API as JSON in the POST request, the value of the value parameter will end up as a JSON string inside of JSON. Depending on the programming language you use, you may have to use escaping or some other mechanism to make sure that the JSON string for the value value is rendered properly. Here are some examples of how part of the POST request body JSON might look in a programming language where escaping is done by preceding a character with a backslash:
if the value is a string:
{
...
"property": "P1234",
"value": "\"WGS84\"",
...
}
if the value is an item:
{
...
"property": "P9876",
"value": "{\"entity-type\":\"item\",\"numeric-id\":1}",
...
}
Because the quotes that are part of the value parameter value string are inside the quotes required by the request body JSON, they were escaped as \".
For JSON data sent by the requests Python library as the body of a POST request, the JSON can be passed into the .post() method as a dictionary data structure, and requests will turn the dictionary into JSON before sending it to the API. To some extent, that allows one to dodge the whole escaping thing by using a combination of single and double quotes when constructing the dictionary. So in Python, we could code the dictionary to be passed by requests like this:
if the value is a string:
{
...
'property': 'P1234',
'value': '"WGS84"',
...
}
if the value is an item:
...
'property': 'P9876',
'value': '{"entity-type":"item","numeric-id":1}',
...
}
since Python dictionaries can be defined using using single quotes. Other kinds of values such as geocoordinates will have a different structure for their value string.
I ran into problems in Python when I tried to build the value values for the POST body dictionary by directly concatenating string variables with literals containing curly braces. Since Python uses curly braces to define string replacement fields, it got confused and threw an error in some of my lines of code. The simplest solution to that problem was to construct a dictionary for the data that needed to be turned into a string value, then pass that dictionary into the json.dumps() function to turn the dictionary into a valid JSON string (rather than trying to build that string directly). The string resulting as output of json.dumps() could then be assigned as the value of the appropriate parameter to be included in the JSON sent in the POST body. You can see how I used this approach in lines 128 through 148 of this script.
I realize that what I've just described here is about as confusing as trying to watch the movie Inception for the first time, but I probably wasted at least half of the time it took me to get my bot script to work by being confused about what a snak was and how to construct the value of the value parameter. So at least you will have a heads up about this confusing topic, and by looking at my example code you will hopefully be able to figure it out.
Putting it all together
So to summarize, here are the steps you need to take to write to any Wikibase installation using the MediaWiki API:- Create a bot to get a username and password.
- Determine the structure of the JSON body that needs to be passed to the API in the POST request for the desired action.
- Use the bot credentials to log into an HTTP session with the API and get a CSRF token.
- Execute the code necessary to insert the data you want to write into the appropriate JSON structure for the action.
- Execute the code necessary to perform the POST request and pass the JSON to the API.
- Track the API response to determine if errors occurred and handle any errors.
- Repeat many times (otherwise why are you automating with a bot?).
This tutorial will walk you through the steps and provides code examples and screenshots to get you going.
If you are writing to the "real" Wikidata instance of Wikibase, you need to take several additional steps:
- Create a separate bot account.
- Define what the bot will do and describe those tasks in the bot's talk page.
- Request approval for permission to operate the bot.
- In programming the bot, figure out how you will check for existing records and avoid creating duplicate items or claims.
- Perform 50 to 250 edits with the bot to show that it works. Make sure that you throttle the bot appropriately using the Maxlag parameter.
- After you get approval, put the bot into production mode and monitor its performance carefully.
The Wikidata:Bots page gives many of the necessary administrative details of setting up a Wikidata bot.
For writing to the "real" Wikidata, you might consider using the Pywikibot Python library to build your bot. I've written a tutorial for that here. Pywikibot has built-in throttling, so that takes care of potential problems with hitting the API at an unacceptable rate. However, in tests that I carried out on our test instance of Wikibase hosted on AWS, writing directly to the API as I've described here was about 60 times faster than using Pywikibot. So if you are writing a lot of data to a fresh and empty Wikibase instance, you may find using Pywikibot's slow speed frustrating.
This comment has been removed by a blog administrator.
ReplyDelete